Showing posts with label Before and After. Show all posts

Wednesday, October 9, 2013

The End of an Era

What an end to September and start to October!! Between a trip to London for a wedding and to get our apartment organised to sell, and work trips to Florida and California I am starting to feel a little more burned out than usual! And, alas my posts seem to suffer! I am quite excited however that after almost a decade of being a die hard Blackberry supporter I have made the leap to Apple and am waiting for my shiny new *gold* iPhone! Very excited at the prospect of Instagram and being able to tweet without my messages being lost in the cyber yonder...not really sure how that keep happening.  So prepare for me to (hopefully) be more in touch over the coming weeks and months.  An early New Years resolution as well.

Since the apartment is up for sale I thought that I would share the estate agent photos with you. I know I have done a couple of posts on it before (here and here), however thought that this was a good overview of the entire apartment - oh and you get to see the amazing new fold-away doors we installed in the spring. Sad to see it go, but excited for what NYC opportunities open up as a result! Keep an eye out as we are actively apartment hunting and I'm keeping my fingers crossed for another project.  Can't wait for the next one!


Photos courtesy of Chesterton Humberts


Friday, October 19, 2012

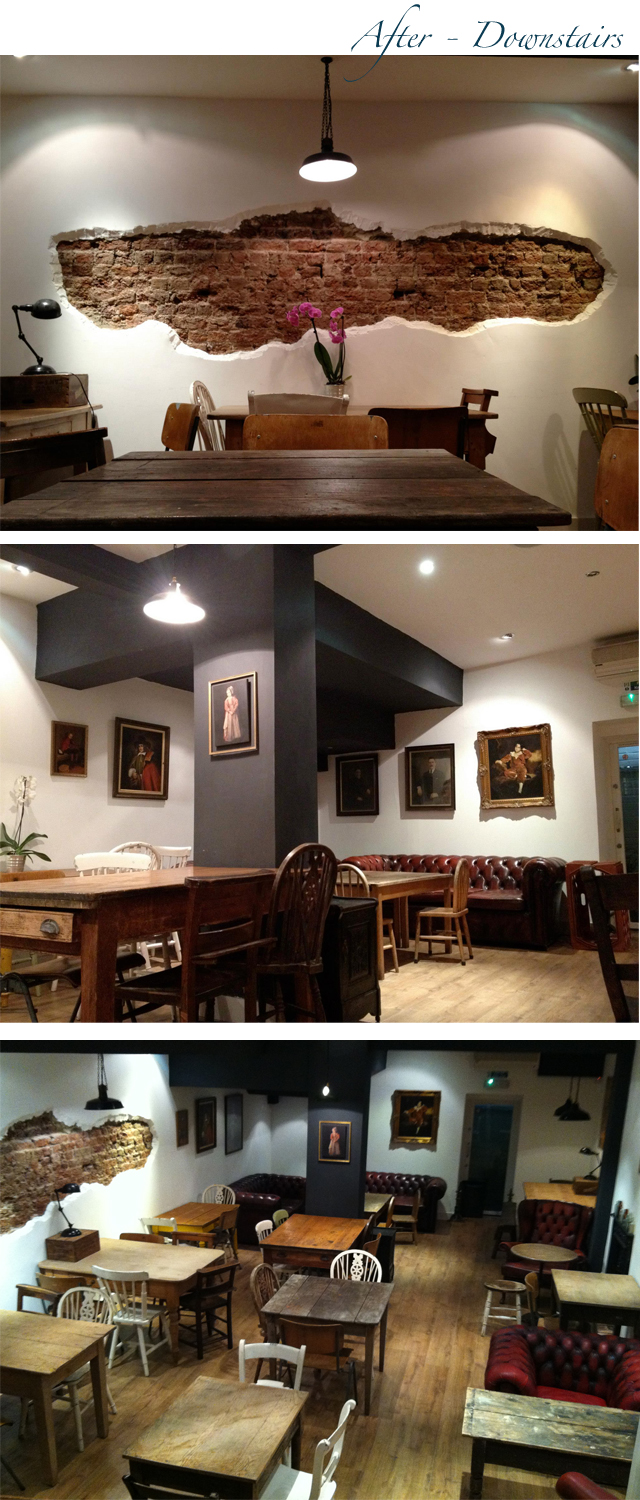
Before & After : London Cafe


I am so excited for today's Before & After post as it is very close to my heart!! Friends of ours in London have embarked on an incredible adventure and have come out on top.  Leyas coffee shop was born out of their dream of converting an old deli in London'd Camden area into an artesian coffee shop.  The vibe is fresh, fun and trendy, and  it is wonderful to see how the owners managed to turn their vision into reality. 


WIth the use of reclaimed materials, old furniture and some very creative thinking, this interior has become a hip spot in this ever trendy area of the city.  I had a chance to ask one of the owners a couple of questions to get an idea of where their inspiration came from and how they managed to put this amazing transformation together with a cery little budget.

Where did your inspiration come from?
Inspiration came from loads of other coffee shops , mainly in east london, and my love of antiques. also rummaging through scrap yards and reclamation yards finding the odd pieces and trying to build around that.

Where did you purchase most of the furniture?
Most of it came through a small antiques shop in north london run by a 60 year old japanese man who would always suprise us with his new finds. other places were ebay, collecting from all over London and a few odds markets here and there.

What is the front of the upstairs counter made from?
The upstairs counter was always going to be the first piece people saw so we wanted to make something unusual. we luckly came across loads of old fruit crates, some were broken but we bought them anyway. we decided to make a supporting frame and nail loads of these broken fruit crate slats all over, we were happy with the look, so it then became our signature look that we applied all over. to tie upstairs with downstairs, we also did a similar piece to "hide" our under staircase storage cupboard. 


The sop is decorated very creatively, and so many materials have been repurposed.  There are some great little details that really make the space - check out the old coffee grinders and the little easels and chalk boards displaying drink prices (see image above for both). 


There is a brilliant mural going up the stairs to the food service area which is not just a great piece of street art but it really helps bring the space together.  


Leyas has delicious food, perfect coffe and a fantastic atmosphere.  For all those in London you have to go now, and for those on their way, I highly recommend this stop.  You can link up with Leyas on facebook and twitter as well.


Tuesday, October 2, 2012

Before & After : Dresser

This weekend was the first that I was home for I don't know how long so I thought that it would be the perfect time to do a little DIY project that I have had on the back-burner for a little while.  My hubby and I love all the treasures that you can find in this magical city, and out new building has the most amazing market-place that I have ever seen.  We are firm believers in "one persons garbage is another's treasure" and so when we came across this simple IKEA dresser we knew that it had lots of potential.  I have always liked the idea of adding a little wallpaper or wrapping paper to a project, and thought that this would be the perfect time to try.  


Although a little time consuming - literally waiting for paint to dry - all in all it was a very simple and rewarding project. I needed three main things:
1. Paint : Pratt & Lambert, colour 30-18 Witching Hour
2. Wrapping Paper : I decided to go for something whimsical with a little pattern
3. Hardware : Horton Brass 3 3/4" bin pull in Dark Antique

After gently roughing up the finish of the wood with sandpaper, I applied two coats of paint, cut pieces of wallpaper to fit and pasted it on with Mod Podge and then fit the pulls.  I think that the dresser looks like it has a new lease on life and we have a little pop of interest in our bedroom.  This really was a fun and easy project and in total cost me about $40 - not bad for a complete make-over!


Thursday, July 12, 2012

Classic Elegance in Edinburgh

I am so excited for today's post...can actually not really contain it!!  As mentioned in my Sneak Peek on Monday, one of my closest friends in the UK has undertaken an extraordinary home challenge and boy have they prevailed.  She and her partner purchased a ground floor apartment in a two-story house and proceeded to have their lived taken over by renovating it top to bottom.  Susanne and I work together when we both lived in London (she is a supremely talented Architect and Interior Designer) and so when they saw this apartment they knew they were going to be working with some good - yet old - bones.  With original hardwood flooring, amazing door casings and mouldings throughout, this apartment was screaming for some TLC and someone to swoop in to revive what had been so clearly neglected over the years. They didn't have a big budget and so were planning to do as much of the work as they possibly could themselves, and with her trade connections, Susanne was able to economically piece things together even more - it is amazing what a research and hard work will give you!

KEY FACTS:
Location - Edinburgh, Scotland
Date and Period of the property - 1910, Victorian
Size - approximately 1300 square feet
Construction - 3 months
Painting & Interiors (by themselves) - 6 months

In her own words Susanne describes the project, process, and ways they made this incredible space come alive with a next-to-nothing budget:
The main thing for me was to finally have the chance to do a project for myself. It was amazing but hugely challenging. All our money went on the structural works to change it from a one to a three bed - which in a 100-year-old house with neighbours above you is never easy. So when the builders left we had no budget to do the interiors. This meant lots of trips to the dump and charity shops for old furniture that I could give a new lease of life to, or making things myself such as blinds, or improving cheap products like drum pendants by lining them myself. In the end I don't think the project is leading the design world but I am so proud as I am not sure anyone could do better with the budget we had!

Thank you so much for sharing your incredible apartment and process with all of us, it truly is a stunning home.


The Living room was dingy and depressing and had no redeeming qualities visible that brought one back to this being a Victorian house.  They added a simple acanthus style moulding to tie in the detailing that is throughout the rest of the house.  With the Entry and most of the house, the boards were sanded and re-finished bringing them back to their original glory, however they were not existing in the living room so new boards were added to tie in with original ones throughout.  The fireplace was non-existent and so a fitting design was sourced from a Architectural salvage yard.  This fireplace tiles are by William de Morgan, big at the time of William Morris and the Arts and Crafts movement, and the surround is painted pine to match the walls that are Farrow & Ball Pointing.


The kitchen only had small window originally - their goal was to make this room bright and light, and so the two windows at the back were removed and large French doors were added instead.  The architectural detailing in this space was kept to a minimum, and the focus was on a great, functional, family kitchen.  The cabinets are from a German company called Benchmarx – they’re cheap and available through builder's merchants, and are around the same price point as IKEA.  The big splurge was on the counter which is an Ivory colour called Yukon from Silestone - Susanne said it cost more than all the cabinets but this was one place she wanted to have a good quality piece and wasn't going to settle for something too white or cream. 


The little room above the kitchen (see plans at the end), again was a dingy little space.  With the addition of two skylights, and by painting the floorboards in with the colour of the walls, they were able to create a bright, light space that doubles as home office and dining room. The room is a bit of an awkward shape, so really the goal was to open it up and make it seem larger - achieved!


For me the most incredible room in the whole house is the master bedroom.  With stunning original features and a large bay window, this suite really is a sophisticated oasis. The room layout was changed in the plan to add an ensuite bathroom to the master bedroom, and this also shares the wall with Bedroom 3 creating a nursery or kids room right off the main bedroom.  As with other areas the floors in the bedroom were brought back to original and the palette was kept clean and simple.  The vanity in the bathroom came from a charity shop in Glasgow and was a very economical £45.  She stained it and changed handles, and voila...looks priceless!  The bath surround is mirrored to make the room feel larger, and the shower tiles are standard architect supply Johnsons Tiles, Prismatics range, colour Barley in gloss.


And to give an idea what kind of a transformation was done, here are the drawings below to help illustrate all the work. Congratulations Susanne, what an incredible apartment you have so brilliantly transformed!


Tuesday, March 6, 2012

Before & After : Kitchen

This is the second installment of our London renovation (to see the bathroom Before & After click here), and I am happy to be showing you the transformation of our kitchen. We really thought through the details and materials of the space as well as the layout of the cabinetry so as to maximise the space in the kitchen but not lose out on storage.  When we were done we couldn't believe the way the space worked and looked, and feel that it came out even better than we were expecting - I hope you all enjoy!

It was clear to us when we walked in, and as you can see from the image below, the kitchen was in desperate need of a make-over.  We knew that there was nothing that we wanted to keep and so quickly tore everything out. The previous owner had tried to fit as many standard cabinets in as they could wich gave the room a very fragmented feeling, and with all the appliances exposed it was all very messy.  The flooring was a wood printed vinyl and had this weird squishy feeling to it when you walked (ugh) so that had to go. Things like the lighting under the cabinets was a great idea, just badly executed, same with the pendant, and so we felt that we could keep these, but just work them into the new layout in a better way.  

Our whole renovation was on a budget and so we tried to work out where we wanted to spend and where we thought we could save.  We knew that we were going to install hardwood flooring throughout the majority of the apartment so a large part of our budget was going to be put into that.  As the overall layout of appliances and services wasn't bad we decided to keep the sink, oven and cooktop where they originally were so we didn't have to move plumbing and gas supplies. This also allowed us to install the dishwasher beside the sink and use the plumbing from there.  

There is a large window in the room and so it gets a lot of natural light. This helped us feel like we could install dark grey lacquer cabinetry as not only is it reflective, but since the room is so tall, and the window brings in light, we didn't worry about it feeling dark.  The cabinetry is IKEA Abstrakt Grey and the counters are IKEA Numerar oak, both were very cost effective and gave us the look we were going for. Since the ceilings in the house are so high this also allowed us to install the extra tall upper cabinets giving us that little bit more storage space.  

The rest of the fittings and accessories were determined by the link we were creating between the existing architecture and new kitchen. We used a very simple slim matt white subway tile for the backsplash and it had a little bit of a beveled edge, playing homage to the age of the house.  When it came to painting the room, we painted 3 of the the walls a very light grey, and the wall oposite the cabinets (the long one leading down the hall) we painted in Bone China Blue from  the Little Green Paint Company just to give a pop of colour.  Because of the chimney flue that sticks into the space we didn't have a whole lot of counter and for food prep this is key.  Since we removed the table in the room we wanted to bring in something that not only we could sit at but could act as a worktop when needed.  We discovered a great workshop called Gathering Moss, who work in recycled wood/ We commissioned them to make us a moving storage island out of old barn wood, and since we had a piece of countertop left over, had the top made from the same oak as the rest.  After using the kitchen this quickly became one of my favorite pieces.  On the whole we wanted to kitchen to feel clean and simple and with all the appliances tucked away (the on-demand water heater is in a cabinet above the sink) we really feel like we achieved more than we thought we could.

The room also had a door into it from the hallway, making it feel like an enclosed space smaller than it actually was.  My husband had the great idea to remove the door, and surrounding wall, and create a seamless passage from the corridor into the kitchen (see below right image).  This was probably one of the largest transformations of the space as it brought the kitchen into the rest of the apartment and with the opening being full-height really made the space feel larger and taller.  It also gave us a great large  'canvas' for the blue paint I so wanted to use!

We wanted to keep the fittings and accessories in the kitchen simple, modern but as with the rest of the  kitchen, we wanted them to work with the architecture of the rest of the space.  Below are a few of the accessories and fittings that we purchased for the kitchen, and really helped to make it the space that we love and spent a lot of time in.


1. We are a huge fan of large industrial pendants.  As the kitchen was modern, but in a traditional architectural space, we wanted something that would work with both. For me this meant not getting something too 'factoryesque', but rather a pendant with clean lines and a colour/tone to work with the scheme of the room.  We settled on the Titan 3 from Original BTC and were so happy with the decision (actually installed a second one in another room, so stay tuned to see where...).   

2. With the kitchen being IKEA, one of the best tips I can give is that if you change something, like the hardware, it helps to give the cabinetry a more custom look. Immediately it doesn't look like a standard kitchen, and it is a very inexpensive way to give the cabinetry a little lift.  We used simple brushed chrome cube knobs on the doors and levers on the drawers and appliances (dishwasher, fridge and freezer) that we bought at a architectural hardware store called Franchi.  

3. I think that the kitchen tap is so important both in terms of aesthetics but also functionality.  For me, I have always wanted a pull out nozzle and so this was my chance.  I had installed Franke taps on projects before and always loved their clean and simple design and felt that the Fuji tap was for us - monoblock, single lever with a pull-out nozzle. Perfect! 

4. As mentioned above, we had a little mobile storage island made and we very much enjoyed sitting at for breakfast or just a little cheese board on the weekend and bought some red Tolix stools. They were comfortable to sit on and when we weren't using them, they didn't take up too much space.  They also served double-duty as I am not very tall and sometimes needed help reaching items high up in the cupboards!  

Tuesday, February 28, 2012

Before & After : Bathroom

As you know we moved to Manhattan about seven months ago from London.  We weren't really ready to leave London, but when my husband's company offered us the opportunity to live in New York how could we say no?  The offer was kind of a shock as we were settling in to life in the UK and had even  just purchased a 600 square foot apartment in North London (Tufnell Park to be exact) in July 2010. 

With me being a designer, and my husband being great at DIY (I mean AMAZING!), we were looking for a project.  Not only did we think that it would be a good way to increase the value of our investment, but neither of us could picture moving into a perfectly renovated apartment - we wanted to put our own stamp on it.  We made an appointment with the estate agent to go and look at an apartment and when we arrived realised that we were not seeing the one we thought. The agent explained that the one we originally wanted to see was no longer available, however this one was so why don't we take a look.  At first we laughed our way around - the apartment looked like something out of the 80's with bad kitchen cabinets and bathroom tiles, vinyl faux tile and wood flooring, surface-mounted cabling running all over, and a retro infrared multi-room stereo system. With all that being ridiculed, the more we walked around the more we realized that it was perfect! 8 weeks later we were the proud first-time apartment owners and had a big project on our hands.

Over the next couple of weeks I will take you through our renovation starting toady with the bathroom!  As you can see from the images below the bathroom was in need of a serious facelift! The tiles were out-dated, the room wasn't well organised and felt really dark and tiny, and with very high ceilings in such a small room, it just felt like the proportions were all wrong.  We wanted to make the room feel larger, brighter and more modern.
As neither of us really take baths we decided to remove the bath and install a walk-in shower instead. This really helped to make the room feel much larger as it opened up the floor space.  We also wanted to make the scale of the room feel more proportioned so lowered the ceiling about 30cm - this gave us space to recess the extractor vent and LED lighting which added a lot of light and brightness to the space. We installed large white gloss subway tiles 3/4 way up two walls and slate tiles (both from Fired Earth) for the flooring to keep the material palette very simple.  The paint on the other two walls and above the tiles was a gloss Slate III from Paint & Paper Library, a colour I used on several clients projects and was dying to have in my own house. We kept the fittings very modern and minimal with chrome and white porcelain.  On the whole the room turned out exactly as we wanted, and with the mirrored cabinet above the sink we even got some much needed storage!

LinkWithin

Related Posts Plugin for WordPress, Blogger...